Showing posts with label Tricks. Show all posts

Ice Cream Ball - Play & Freeze Maker

How to make ice cream in this clever contraption.


Ice Cream Ball - Play & Freeze Maker
Just when you thought making ice cream was old hat, someone comes out with a cool contraption that makes you work for your dessert. With the Play & Freeze Ice Cream Maker, there's no need for electricity. Just add ice and rock salt in one end and ice cream mix in the other end--then have a ball as you shake it, pass it, or roll it. The ice cream mix can be as simple as cream, sugar, and vanilla, but the footwork on the ball is all you.

    Materials

    The Play & Freeze Ice Cream Maker comes in two sizes - standard and mega. You'll also need the ingredients to make ice cream. Here's the basic vanilla recipe...

    Basic Vanilla Ice Cream

    • 1 pint of Half & Half*
    • 1 1/2 teaspoons vanilla
    • 1/3 cup + 2 Tablespoons sugar
    • Ice
    • Rock salt
    *Using whole cream makes a richer, creamier ice cream. Using part milk and Half and Half makes a lighter ice cream, but takes longer to freeze. Yield: about a pint of smooth and creamy ice cream.

    Experiment


    1. Fill the ice end with as much ice as possible and then add 1/2 cup of rock salt. (MEGA: Add 3/4 cup of rock salt).
    2. The lid should be hand tightened - do not use the wrench! Mix up your ice cream ingredients in a container, then pour the mix into the end with the metal cylinder, leaving about an inch for expansion at the top.
    3. Hand tighten the lid. Have a ball! Shake, roll, and pass it around as you mix and freeze the ingredients. It's not necessary to shake the ball...just motion will do it! After about 10 minutes (15 for the MEGA ball) open the ice cream end using the included plastic wrench.
    4. Scrape the sides of the cylinder to mix up the ice cream using a plastic or wooden spoon (don’t use a metal spoon as it will scratch the cylinder). Then check the ice end.
    5. Pour out the excess water and add more ice and up to 1/3 cup more rock salt to enhance the freezing ability. Close the lids securely and continue having a ball for approximately 5–10 more minutes. (15 for MEGA)
    You now have about a pint (or quart for the MEGA ball) of delicious soft-serve ice cream. The consistency will vary based on the ice, your mix, the outside temperature, shaking frequency, etc. Once the ice cream is to the consistency of your liking, gently scoop it out, and enjoy!

    How does it work?

    What does the salt do? Just like we use salt on icy roads in the winter, salt mixed with ice in this case also causes the ice to melt. When salt comes into contact with ice, the freezing point of the ice is lowered. The lowering of the freezing point depends on the amount of salt added. The more salt added, the lower the temperature will be before the salt-water solution freezes. For example, water will normally freeze at 32 degrees F. A 10% salt solution freezes at 20 degrees F, and a 20% solution freezes at 2 degrees F. When salt is added to the ice, some of the ice melts because the freezing point is lowered.

    Always remember that heat must be absorbed by the ice for it to melt. The heat that causes the melting comes from the surroundings (the warmer cream mixture). By lowering the temperature at which ice is frozen, you were able to create an environment in which the cream mixture could freeze at a temperature below 32 degrees F into ice cream.

    source: http://www.stevespanglerscience.com/experiment

    Color Mixing Wheel - Sick Science

    Create a wheel that will show you color and color mixing in a new way


    Color Mixing Wheel - Sick Science
    Our visual division here at Steve Spangler Labs loves the science of color mixing. We've mixed gels, fizzing tablets, and even different colored lenses together to get the secondary colors. We needed something new. So, we found an amazing way to combine scientific principles of physics with the visual science of color mixing. Our discovery isn't just visually spectacular, it's scientifically sound!

    Materials

    • White corrugated cardboard
    • Pointed tip scissors
    • Red, blue, & yellow markers
    • String or yarn
    • Safety glasses
    Color Mixing Wheel
    Color Mixing Wheel
    Color Mixing Wheel
    Color Mixing Wheel
    Creating the Color Mixing Wheel
    1. Trace a circle onto a piece of white corrugated cardboard. Try to get the circle to be between 4 to 6 inches in diameter. Use something like a cream cheese lid, sour cream lid, or pickle jar.
    2. Cut the traced circle out using the scissors.
    3. Trace 3 smaller circles on the cardboard disc. Try to make each of the circles equal in width. This will enhance the visual aspect of the experiment.
    4. Draw a single line through the middle of the disc that spans the entire diameter of the disc. Each of the three circles in the disc should now be divided in half.
    5. Color half of the smallest circle blue and the other half yellow. Color the middle circle half red and half yellow. Finally, color the largest circle half blue and half red.
    6. Grab an adult for this step: Using the pointed tip of the scissors, place two holes in the cardboard disc. Make sure the holes are an equal distance from the center of the disc and are about 1 inch apart.
    7. Use the scissors to cut a piece of string or yarn that is 4 feet long.
    8. Thread the string or yarn through each of the holes in the disc and tie the ends of the string together. Make sure the knot you tie is reliable and able to withstand a substantial amount of force. You are going to be tugging pretty hard on it.
    Performing the Experiment
    1. Start by holding the string on both sides of the disc with your hands. Make sure the disc is as close to the center of the string as possible.
    2. Spin the disc in a motion similar to a jump rope. This is a quick way to get the string wound up.
    3. Once the string on both sides of the disc is twisted, pull the string tight to get the Color Mixing Wheel spinning. It might take a little practice to get it just right.
    4. Once you have the hang of how the Color Mixing Wheel works, you'll be able to keep it going as long as you want.

    Observations

    You may have noticed that the colors you put on the Color Mixing Wheel were the three primary colors: red, blue, and yellow. Once you started spinning the wheel, what did you notice about each of the three color circles on the cardboard disc?  What do you think makes this happen?

    How does it work?

    Let's start with the visual part of the experiment - color mixing.  The colors you put on the Color Mixing Wheel are the three primary colors: red, blue, and yellow.  When you combine two primary colors you get the secondary colors: green, purple, and orange. Obviously, the individual colors on the wheel are not mixing. The color mixing that happens is due to the speed at which the wheel is spinning as the string twists it.  The colors are spinning at such a rate that your brain is unable to process them as the individual colors that are on the wheel.  Instead, your brain takes a shortcut and creates the secondary colors.
    Now, why does the string continue to twist?  The answer lies in physics and, in particular, momentum.  Once you have the string twisted, pulling on each end causes it to go tight.  When the string is pulled tight, it wants to be completely straight.  In going straight, the string unwinds from itself and causes the disc to spin one direction.  But the string doesn't stop once it's unwound. It speeds past and gets twisted again.  The momentum from pulling the string tight keeps the disc spinning until all the momentum is gone. Then you pull the strings tight again and set the disc spinning in another direction.

    source: http://www.stevespanglerscience.com/experiment

    Eye Dropper Cartesian Diver

    Is it mind control or just a clever science trick


    Eye Dropper Cartesian DiverIs it mind control or just a clever science trick? It's a classic science experiment using an eye-dropper, a soda bottle filled with water, and some great showmanship. Explore the science of Cartesian divers while amazing your friends with your telekinetic powers. Yeah, right!
    This experiment is named after Ren Descartes (1596-1650), a French scientist and mathematician who used the diver to demonstrate gas laws and buoyancy.

    Materials

    • A plastic soda bottle with a cap
    • A glass eye-dropper
    • Water
    Experiment:
    1. Fill the plastic soda bottle to the VERY top with water.
    2. Fill the glass eyedropper 1/4 full with water.
    3. Place the eyedropper into the soda bottle. The eyedropper should float and the water in the bottle should be overflowing. Seal the bottle with the cap.
    4. Squeeze the sides of the bottle and notice how the eyedropper (called a diver) sinks. Release your squeeze and it floats back up to the top. Squeeze again and observe the water level in the eyedropper (it goes up). Practice making the diver go up and down without making it look like you're squeezing the bottle. Amaze your friends with your ability to make the eyedropper obey your commands!

    How does it work?

    Squeezing the bottle causes the diver to sink because the increased pressure forces water up into the diver, compressing the air at the top of the eyedropper. This increases the mass of the diver causing it to sink. Releasing the squeeze decreases the pressure on the air at the top of the eyedropper, and the water is forced back out of the diver.

    How to get Approval from Google Adsense in 48 Hours

    This is my experience when trying to submit this blog to google adsense. It's too hard to get approved by google. But now, you can get approval easily.

    Everyone like advertisements from google adsense for their websites because google adsense most popular than any advertisement internet services in the world and integration with google. Google adsense is a program which enterprises can display google advertisements on websites and earn revenue from hits that generate traffic for the google search engine’s.

    2qbbsls Tutorial   100% Get Approval Google Adsense via Indyarocks.com

    The big problem from google adsense is about get approval. Google adsense only for websites or blog with specific terms like below:

    1. English languange or other languange support by google adsense is a primary key for a website.
    2. Must have unique contents and not duplicate from others website or using autoblog feature.
    3. That’s website must running up to six months and not in “under construction”.
    4. Must top level domain and not part domain.
    That’s too hard and long for beginners to get approval from google adsense and maybe fifty-fifty to success. I have the best and quickly solution for thats problem with third-party sites like indyarocks.com and docstoc.com from my experience. In this tutorial only explain how to get approval 100% from google adsense with indyarocks.com. Indyarocks.com is a social networking similarly as facebook from india.
    1. Click this link to indyarocks.com
    2. Must register with your account e-mail from gmail.com and not from other e-mail services because its about strategy marketing from google.com.
    3. Complete your profile up to 50% or 97% (recommended).
    4. Upload 10 photos or more.
    5. Write 2 or more blogs originally content with english language and don’t forget set visible to everyone and add related tags.
    After you fulfilled all the requirements above, click “my life” at indyarocks.com and right sidebar write “Google Adsense” click and submit your request. You have received a mail from indyarocks.com with title “Google AdSense Access Verification for indyarocks.com” for complete verification and after that you should get google adsense mail with approximately 48 hours.

    hope this tutorial can help you to get the Google Adsense.

    Dry Ice Crystal Ball Bubble

    It's the world's coolest crystal ball.


    Dry Ice Crystal Ball BubbleIt's the world's coolest crystal ball. Create a soap film on the rim of the bucket and you'll have what appears to be a crystal ball filled with a cloud-like mixture of water vapor and carbon dioxide.

    Materials

    • Large bucket with a smooth rim
    • Solution of dish soap and water
    • A piece of cloth 18 inches long
    • Gloves
    • Safety glasses
    • A few pieces of dry ice

    Dry Ice - Grocery stores use dry ice to keep food cold during shipping. Some grocery stores and ice cream shops will sell dry ice to the public (especially around Halloween) for approximately $1 per pound. It's a good idea to take a beverage cooler with you along with a pair of gloves to protect your hands. If you are planning to perform a number of dry ice demonstrations, plan to purchase 5 to 10 pounds.

    Experiment
    1. Dry Ice Crystal Ball BubbleSelect a bucket or container that has a smooth rim and is smaller than 12 inches in diameter.
    2. Cut a strip of cloth about 1 inch wide and 18 inches long (an old t-shirt works well). Soak the cloth in a solution of Dawn dish soap or use your favorite recipe for making bubble solution. Make sure that the cloth is completely soaked.
    3. Fill the bucket half full with water. Have tongs or gloves ready to transfer the dry ice to the bucket.
    4. Place two or three pieces of dry ice into the water so that a good amount of fog is being produced.
    5. Remove the strip of cloth from the dish soap and carefully pull the strip across the rim. The goal is to create a soap film that covers the top. It also helps to have the rim wet before you start. This may take some practice until you get the technique mastered. Remember that a bubble's worst enemies are dirt, oil, and rough edges. Your patience will pay off in the long run.
    Dry Ice Crystal Ball Bubble
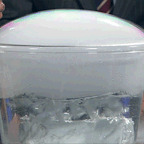
If you accidentally get soap in the bucket of water, you'll notice that zillions of bubbles filled with fog will start to emerge from the bucket. This, too, produces a great effect. Place a waterproof flashlight in the bucket along with the dry ice so that the light shines up through the fog. Draw the cloth across the rim to create the soap film lid and turn off the room lights. The crystal bubbles will emit an eerie glow and you'll be able to see the fog churning inside the transparent bubble walls. When the giant bubble bursts, the cloud of "smoke" falls to the floor, followed by an outburst of ooohs & ahhhs!

    source: http://www.stevespanglerscience.com

    The Egg in the Bottle Trick

    How to get the hard-boiled egg into the milk bottle.


    The Egg in the Bottle Trick
    Here's a classic science experiment that is more than a hundred years old and is guaranteed to fool your friends. The original demonstration used a hard-boiled egg and a glass milk bottle. Since old milk bottles are hard to come by, here's a modern day version of the same experiment, only this time we're using a juice bottle and a water balloon. For even more fun, try our "eggsclusive" upside-down version of the trick!

    Materials

    • A wide mouth juice bottle
    • Hardboiled eggs
    • Several strips of paper (2 x 6 inches)
    • Matches
    • A few balloons
    • Water


    Warning: This experiment requires the help of an adult partner. Don't just pick any adult... try to find a smart one!
    1. Carefully fill the balloon with water so the balloon is about the size of a tennis ball. Tie it off. Make several balloons just in case the first one breaks!
    2. Rinse out the bottle to remove any leftover, sticky, slimy stuff that might be in the bottom. Before going any further, make sure that the water balloon is slightly larger than the mouth of the bottle.
    3. Here’s the challenge... Your job is to find a way to get the balloon into the bottle without breaking it. How are you going to do it? It’s important that you take a minute to test out some of your ideas before jumping ahead to read our solution. Keep trying! Once you've come up with your hypothesis, read on to find out our answer!
    4. Start by smearing some water around the mouth of the bottle.
    5. Have the adult light a match and set the strip of paper on fire. Quickly put the burning strip into the bottle. Be careful you don't accidentally burn your fingers.
    6. Immediately cover the mouth of the bottle with the balloon. In just seconds, the balloon will start to wiggle around on the top of the bottle, the fire will go out, and some invisible force will literally “push” the balloon into the bottle. That’s amazing!
    Now that you've mastered the trick, it's on to the next challenge. Can you get the balloon back out of the bottle? Use what you learned about air and air pressure to come up with a way to get the balloon back out. Here's a hint... Try sneaking a straw alongside the balloon when you pull it out. If the outside air can get inside the bottle, the water balloon will come out!
    Try it with an egg!
    Now that you've mastered the technique, repeat the steps above substituting a hardboiled egg for the water balloon. The trick here is to find an egg that is just a little bigger than the mouth of the bottle - medium size eggs work the best. The other little secret is to grease the mouth of the bottle with vegetable oil so the egg slides right in!
    The Upside-Down Twist
    All you need for this "eggciting" variation is a hardboiled egg, a bottle, several birthday candles, and a match.
    1. Carefully hold the wider end of the egg in one hand and slowly push two birthday candles into the narrow end of the egg.
    2. Light the candles (with the help of an adult) and sing happy birthday to the egg.
    3. Turn the bottle upside-down and slowly move it into position above the flaming candles.
    4. Allow the flames to heat up the air inside the bottle for just a few seconds and then place the bottle down over the candles. The candles will go out and with a "Pop!" the egg will squeeze up into the bottle.
    Want to get the egg back out so you can do it again? Try this, if you dare... put your mouth over the mouth of the bottle and forcefully blow air into the bottle. The egg should pop back out of the bottle right into your mouth! Can it get any cooler than that? (Check out the video called Egg in the Bottle - Upside Down Twist.)

    How does it work?

    In the traditional version of the Egg in the Bottle Experiment, the burning piece of paper heats the molecules of air in the bottle and causes the molecules to move far away from each other. Some of the heated molecules actually escape out past the egg that is resting on the mouth of the bottle (that’s why the egg wiggles on top of the bottle). When the flame goes out, the molecules of air in the bottle cool down and move closer together. This is what scientists refer to as a partial vacuum. Normally the air outside the bottle would come rushing in to fill the bottle. However, that darn egg is in the way! The “push” or pressure of the air molecules outside the bottle is so great that it literally pushes the egg into the bottle.
    In the Upside-Down Twist, the science is the same as the traditional Egg in the Bottle trick, but the whole thing is just inverted. It's a nice twist on a classic science demonstration.

    source: http://www.stevespanglerscience.com