SOURCE CODE (2011)


Quality: BRRip 720p
Release Date: 1 April 2011
Info: imdb.com/title/tt0945513/
Trailer: imdb.com/video/imdb/vi3948911129/
Starring: Jake Gyllenhaal, Michelle Monaghan and Vera Farmiga

SYNOPSIS

A man (Jake Gyllenhaal) wakes up on a train sitting across from a woman named Christina Warren (Michelle Monaghan). The woman seems to know him by the name Sean Fentress, but he doesn't seem to know her and appears uncertain of his own identity. After eight minutes, a bomb goes off on the train, and the man awakens to find himself strapped inside a small geodesic dome. There, Air Force Capt. Colleen Goodwin (Vera Farmiga) explains to him through a computer screen that he is actually Colter Stevens, a decorated army helicopter pilot, now on a mission to locate the maker of a bomb which destroyed a train headed into Chicago. This is to be accomplished using the Source Code, a time loop program that allows him to take over someone's body in a reenactment of their last eight minutes of life.

Stevens has no memory of how he became involved in the Source Code project; his last memory is of flying in a recent mission in Afghanistan while taking on enemy gunfire. Stevens' mission in the Source Code is to assume the identity of Fentress, one of the train's passengers, locate the bomb, discover who detonated it, and report back to Goodwin to prevent the bomber from detonating a larger dirty nuclear device in downtown Chicago, which could cause the deaths of millions of people. Goodwin and the Source Code's creator, Dr. Rutledge (Jeffrey Wright), tell him that the Source Code is not a simulation, but a visit into the past in the form of an alternate reality. He's told that he cannot truly alter the past to save any of the passengers, but that he must gather intel that can be used to alter the future and prevent a future attack. Goodwin assures Stevens that "everything will be OK."


DOWNLOAD
Part 1|Part 2|Part 3 [mkv-600MB]|mf
Part 1|Part 2 [mkv-600MB]|af
Part 1|Part 2 [mkv-600MB]|eu
————————–
Join with HJ-Split
————————–
Subtitle English

New Widget

I want to make a polling...

Is the Twitter widget usefull?? or not necessary???

The End of Space Shuttle Program

The end of the space shuttle program does not mean the end of NASA, or even of NASA sending humans into space. NASA has a robust program of exploration, technology development and scientific research that will last for years to come. Here is what's next for NASA:

Exploration
NASA is designing and building the capabilities to send humans to explore the solar system, working toward a goal of landing humans on Mars. We will build the Multi-Purpose Crew Vehicle, based on the design for the Orion capsule, with a capacity to take four astronauts on 21-day missions.


Multi Purpose Crew Vehicle
The Multi Purpose Crew Vehicle ground test article. Credit Lockheed Martin 
 

We will soon announce the design for the heavy-lift Space Launch System that will carry us out of low Earth orbit. We are developing the technologies we will need for human exploration of the solar system, including solar electric propulsion, refueling depots in orbit, radiation protection and high-reliability life support systems.

International Space Station
The International Space Station is the centerpiece of our human spaceflight activities in low Earth orbit. The ISS is fully staffed with a crew of six, and American astronauts will continue to live and work there in space 24 hours a day, 365 days a year. Part of the U.S. portion of the station has been designated as a national laboratory, and NASA is committed to using this unique resource for scientific research.

The International Space Station is featured in this image taken after Endeavour's departure
The International Space Station in May 2011. Credit: NASA


The ISS is a test bed for exploration technologies such as autonomous refueling of spacecraft, advanced life support systems and human/robotic interfaces. Commercial companies are well on their way to providing cargo and crew flights to the ISS, allowing NASA to focus its attention on the next steps into our solar system.

Aeronautics
NASA is researching ways to design and build aircraft that are safer, more fuel-efficient, quieter, and environmentally responsible. We are also working to create traffic management systems that are safer, more efficient and more flexible. We are developing technologies that improve routing during flights and enable aircraft to climb to and descend from their cruising altitude without interruption.

Image of a cockpit on an airplane.
The Research Flight Deck is being used to develop safer and more efficient cockpit technologies. Credit: NASA


We believe it is possible to build an aircraft that uses less fuel, gives off fewer emissions, and is quieter, and we are working on the technologies to create that aircraft. NASA is also part of the government team that is working to develop the Next Generation Air Transportation System, or NextGen, to be in place by the year 2025. We will continue to validate new, complex aircraft and air traffic control systems to ensure that they meet extremely high safety levels.

Science
NASA is conducting an unprecedented array of missions that will seek new knowledge and understanding of Earth, the solar system and the universe. On July 16, the Dawn spacecraft begins a year-long visit to the large asteroid Vesta to help us understand the earliest chapter of our solar system's history. In August, the Juno spacecraft will launch to investigate Jupiter's origins, structure, and atmosphere. The September launch of the National Polar-orbiting Operational Environmental Satellite System Preparatory Project is a critical first step in building a next-generation Earth-monitoring satellite system.

Juno Mission to Jupiter (2010 Artist's Concept)
The Juno mission to Jupiter is set to launch in August 2011. Credit: NASA


NASA returns to the moon to study the moon's gravity field and determine the structure of the lunar interior with the October launch of GRAIL. In November, we launch the Mars Science Laboratory named Curiosity on its journey to Mars to look for evidence of microbial life on the red planet. And in February 2012, we will launch the Nuclear Spectroscopic Telescope Array to search for black holes, map supernova explosions, and study the most extreme active galaxies.


source: http://www.nasa.gov/about/whats_next.html


Ice Cream Ball - Play & Freeze Maker

How to make ice cream in this clever contraption.


Ice Cream Ball - Play & Freeze Maker
Just when you thought making ice cream was old hat, someone comes out with a cool contraption that makes you work for your dessert. With the Play & Freeze Ice Cream Maker, there's no need for electricity. Just add ice and rock salt in one end and ice cream mix in the other end--then have a ball as you shake it, pass it, or roll it. The ice cream mix can be as simple as cream, sugar, and vanilla, but the footwork on the ball is all you.

    Materials

    The Play & Freeze Ice Cream Maker comes in two sizes - standard and mega. You'll also need the ingredients to make ice cream. Here's the basic vanilla recipe...

    Basic Vanilla Ice Cream

    • 1 pint of Half & Half*
    • 1 1/2 teaspoons vanilla
    • 1/3 cup + 2 Tablespoons sugar
    • Ice
    • Rock salt
    *Using whole cream makes a richer, creamier ice cream. Using part milk and Half and Half makes a lighter ice cream, but takes longer to freeze. Yield: about a pint of smooth and creamy ice cream.

    Experiment


    1. Fill the ice end with as much ice as possible and then add 1/2 cup of rock salt. (MEGA: Add 3/4 cup of rock salt).
    2. The lid should be hand tightened - do not use the wrench! Mix up your ice cream ingredients in a container, then pour the mix into the end with the metal cylinder, leaving about an inch for expansion at the top.
    3. Hand tighten the lid. Have a ball! Shake, roll, and pass it around as you mix and freeze the ingredients. It's not necessary to shake the ball...just motion will do it! After about 10 minutes (15 for the MEGA ball) open the ice cream end using the included plastic wrench.
    4. Scrape the sides of the cylinder to mix up the ice cream using a plastic or wooden spoon (don’t use a metal spoon as it will scratch the cylinder). Then check the ice end.
    5. Pour out the excess water and add more ice and up to 1/3 cup more rock salt to enhance the freezing ability. Close the lids securely and continue having a ball for approximately 5–10 more minutes. (15 for MEGA)
    You now have about a pint (or quart for the MEGA ball) of delicious soft-serve ice cream. The consistency will vary based on the ice, your mix, the outside temperature, shaking frequency, etc. Once the ice cream is to the consistency of your liking, gently scoop it out, and enjoy!

    How does it work?

    What does the salt do? Just like we use salt on icy roads in the winter, salt mixed with ice in this case also causes the ice to melt. When salt comes into contact with ice, the freezing point of the ice is lowered. The lowering of the freezing point depends on the amount of salt added. The more salt added, the lower the temperature will be before the salt-water solution freezes. For example, water will normally freeze at 32 degrees F. A 10% salt solution freezes at 20 degrees F, and a 20% solution freezes at 2 degrees F. When salt is added to the ice, some of the ice melts because the freezing point is lowered.

    Always remember that heat must be absorbed by the ice for it to melt. The heat that causes the melting comes from the surroundings (the warmer cream mixture). By lowering the temperature at which ice is frozen, you were able to create an environment in which the cream mixture could freeze at a temperature below 32 degrees F into ice cream.

    source: http://www.stevespanglerscience.com/experiment

    Color Mixing Wheel - Sick Science

    Create a wheel that will show you color and color mixing in a new way


    Color Mixing Wheel - Sick Science
    Our visual division here at Steve Spangler Labs loves the science of color mixing. We've mixed gels, fizzing tablets, and even different colored lenses together to get the secondary colors. We needed something new. So, we found an amazing way to combine scientific principles of physics with the visual science of color mixing. Our discovery isn't just visually spectacular, it's scientifically sound!

    Materials

    • White corrugated cardboard
    • Pointed tip scissors
    • Red, blue, & yellow markers
    • String or yarn
    • Safety glasses
    Color Mixing Wheel
    Color Mixing Wheel
    Color Mixing Wheel
    Color Mixing Wheel
    Creating the Color Mixing Wheel
    1. Trace a circle onto a piece of white corrugated cardboard. Try to get the circle to be between 4 to 6 inches in diameter. Use something like a cream cheese lid, sour cream lid, or pickle jar.
    2. Cut the traced circle out using the scissors.
    3. Trace 3 smaller circles on the cardboard disc. Try to make each of the circles equal in width. This will enhance the visual aspect of the experiment.
    4. Draw a single line through the middle of the disc that spans the entire diameter of the disc. Each of the three circles in the disc should now be divided in half.
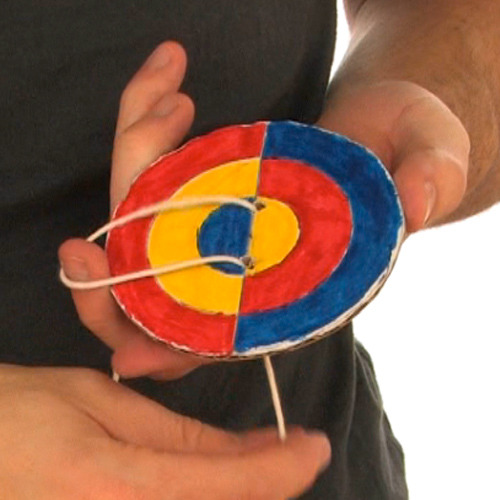
    5. Color half of the smallest circle blue and the other half yellow. Color the middle circle half red and half yellow. Finally, color the largest circle half blue and half red.
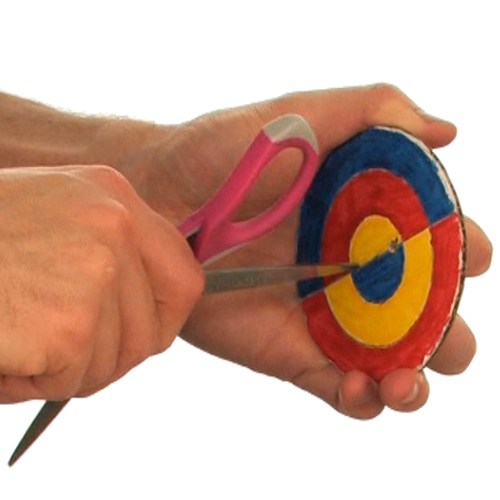
    6. Grab an adult for this step: Using the pointed tip of the scissors, place two holes in the cardboard disc. Make sure the holes are an equal distance from the center of the disc and are about 1 inch apart.
    7. Use the scissors to cut a piece of string or yarn that is 4 feet long.
    8. Thread the string or yarn through each of the holes in the disc and tie the ends of the string together. Make sure the knot you tie is reliable and able to withstand a substantial amount of force. You are going to be tugging pretty hard on it.
    Performing the Experiment
    1. Start by holding the string on both sides of the disc with your hands. Make sure the disc is as close to the center of the string as possible.
    2. Spin the disc in a motion similar to a jump rope. This is a quick way to get the string wound up.
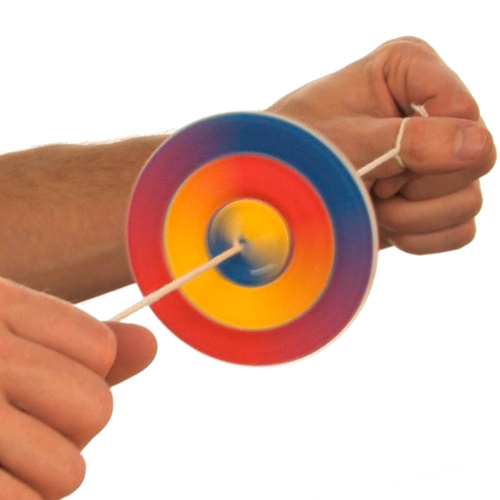
    3. Once the string on both sides of the disc is twisted, pull the string tight to get the Color Mixing Wheel spinning. It might take a little practice to get it just right.
    4. Once you have the hang of how the Color Mixing Wheel works, you'll be able to keep it going as long as you want.

    Observations

    You may have noticed that the colors you put on the Color Mixing Wheel were the three primary colors: red, blue, and yellow. Once you started spinning the wheel, what did you notice about each of the three color circles on the cardboard disc?  What do you think makes this happen?

    How does it work?

    Let's start with the visual part of the experiment - color mixing.  The colors you put on the Color Mixing Wheel are the three primary colors: red, blue, and yellow.  When you combine two primary colors you get the secondary colors: green, purple, and orange. Obviously, the individual colors on the wheel are not mixing. The color mixing that happens is due to the speed at which the wheel is spinning as the string twists it.  The colors are spinning at such a rate that your brain is unable to process them as the individual colors that are on the wheel.  Instead, your brain takes a shortcut and creates the secondary colors.
    Now, why does the string continue to twist?  The answer lies in physics and, in particular, momentum.  Once you have the string twisted, pulling on each end causes it to go tight.  When the string is pulled tight, it wants to be completely straight.  In going straight, the string unwinds from itself and causes the disc to spin one direction.  But the string doesn't stop once it's unwound. It speeds past and gets twisted again.  The momentum from pulling the string tight keeps the disc spinning until all the momentum is gone. Then you pull the strings tight again and set the disc spinning in another direction.

    source: http://www.stevespanglerscience.com/experiment

    Top 20 Unique Facts

    This list explores a variety of fascinating scientific facts that you probably are unaware of. Science is still a very mysterious subject so there are millions of trivial facts about it – this will be the first of many scientific fact lists in the future.

    Facts 1 – 5

    Image002-2

    1. There are 62,000 miles of blood vessels in the human body – laid end to end they would circle the earth 2.5 times
    2. At over 2000 kilometers long, The Great Barrier Reef is the largest living structure on Earth
    3. The risk of being struck by a falling meteorite for a human is one occurrence every 9,300 years
    4. A thimbleful of a neutron star would weigh over 100 million tons
    5. A typical hurricane produces the energy equivalent of 8,000 one megaton bombs

    Facts 6 – 10
    Pine Tree Med
    6. Blood sucking hookworms inhabit 700 million people worldwide
    7. The highest speed ever achieved on a bicycle is 166.94 mph, by Fred Rompelberg
    8. We can produce laser light a million times brighter than sunshine
    9. 65% of those with autism are left handed
    10. The combined length of the roots of a Finnish pine tree is over 30 miles.


    Facts 11 – 15
    Polar-Bear-Tongue
    11. The oceans contain enough salt to cover all the continents to a depth of nearly 500 feet
    12. The interstellar gas cloud Sagittarius B contains a billion, billion, billion liters of alcohol [ JFrater is planning to move there in the near future ]
    13. Polar Bears can run at 25 miles an hour and jump over 6 feet in the air
    14. 60-65 million years ago dolphins and humans shared a common ancestor
    15. Polar Bears are nearly undetectable by infrared cameras, due to their transparent fur

    Facts 16 – 20
    Mercury Tour

    16. The average person accidentally eats 430 bugs each year of their life
    17. A single rye plant can spread up to 400 miles of roots underground
    18. The temperature on the surface of Mercury exceeds 430 degrees C during the day, and, at night, plummets to minus 180 degrees centigrade
    19. The evaporation from a large oak or beech tree is from ten to twenty-five gallons in twenty-four hours
    20. Butterflies taste with their hind feet, and their taste sensation works on touch – this allows them to determine whether a leaf is edible

    Source: http://listverse.com/2007/12/19/top-20-amazing-science-facts/

    Eye Dropper Cartesian Diver

    Is it mind control or just a clever science trick


    Eye Dropper Cartesian DiverIs it mind control or just a clever science trick? It's a classic science experiment using an eye-dropper, a soda bottle filled with water, and some great showmanship. Explore the science of Cartesian divers while amazing your friends with your telekinetic powers. Yeah, right!
    This experiment is named after Ren Descartes (1596-1650), a French scientist and mathematician who used the diver to demonstrate gas laws and buoyancy.

    Materials

    • A plastic soda bottle with a cap
    • A glass eye-dropper
    • Water
    Experiment:
    1. Fill the plastic soda bottle to the VERY top with water.
    2. Fill the glass eyedropper 1/4 full with water.
    3. Place the eyedropper into the soda bottle. The eyedropper should float and the water in the bottle should be overflowing. Seal the bottle with the cap.
    4. Squeeze the sides of the bottle and notice how the eyedropper (called a diver) sinks. Release your squeeze and it floats back up to the top. Squeeze again and observe the water level in the eyedropper (it goes up). Practice making the diver go up and down without making it look like you're squeezing the bottle. Amaze your friends with your ability to make the eyedropper obey your commands!

    How does it work?

    Squeezing the bottle causes the diver to sink because the increased pressure forces water up into the diver, compressing the air at the top of the eyedropper. This increases the mass of the diver causing it to sink. Releasing the squeeze decreases the pressure on the air at the top of the eyedropper, and the water is forced back out of the diver.